认证
理解认证对于保护应用的数据至关重要。本页面将指导您如何使用 React 和 Next.js 的功能来实现认证。
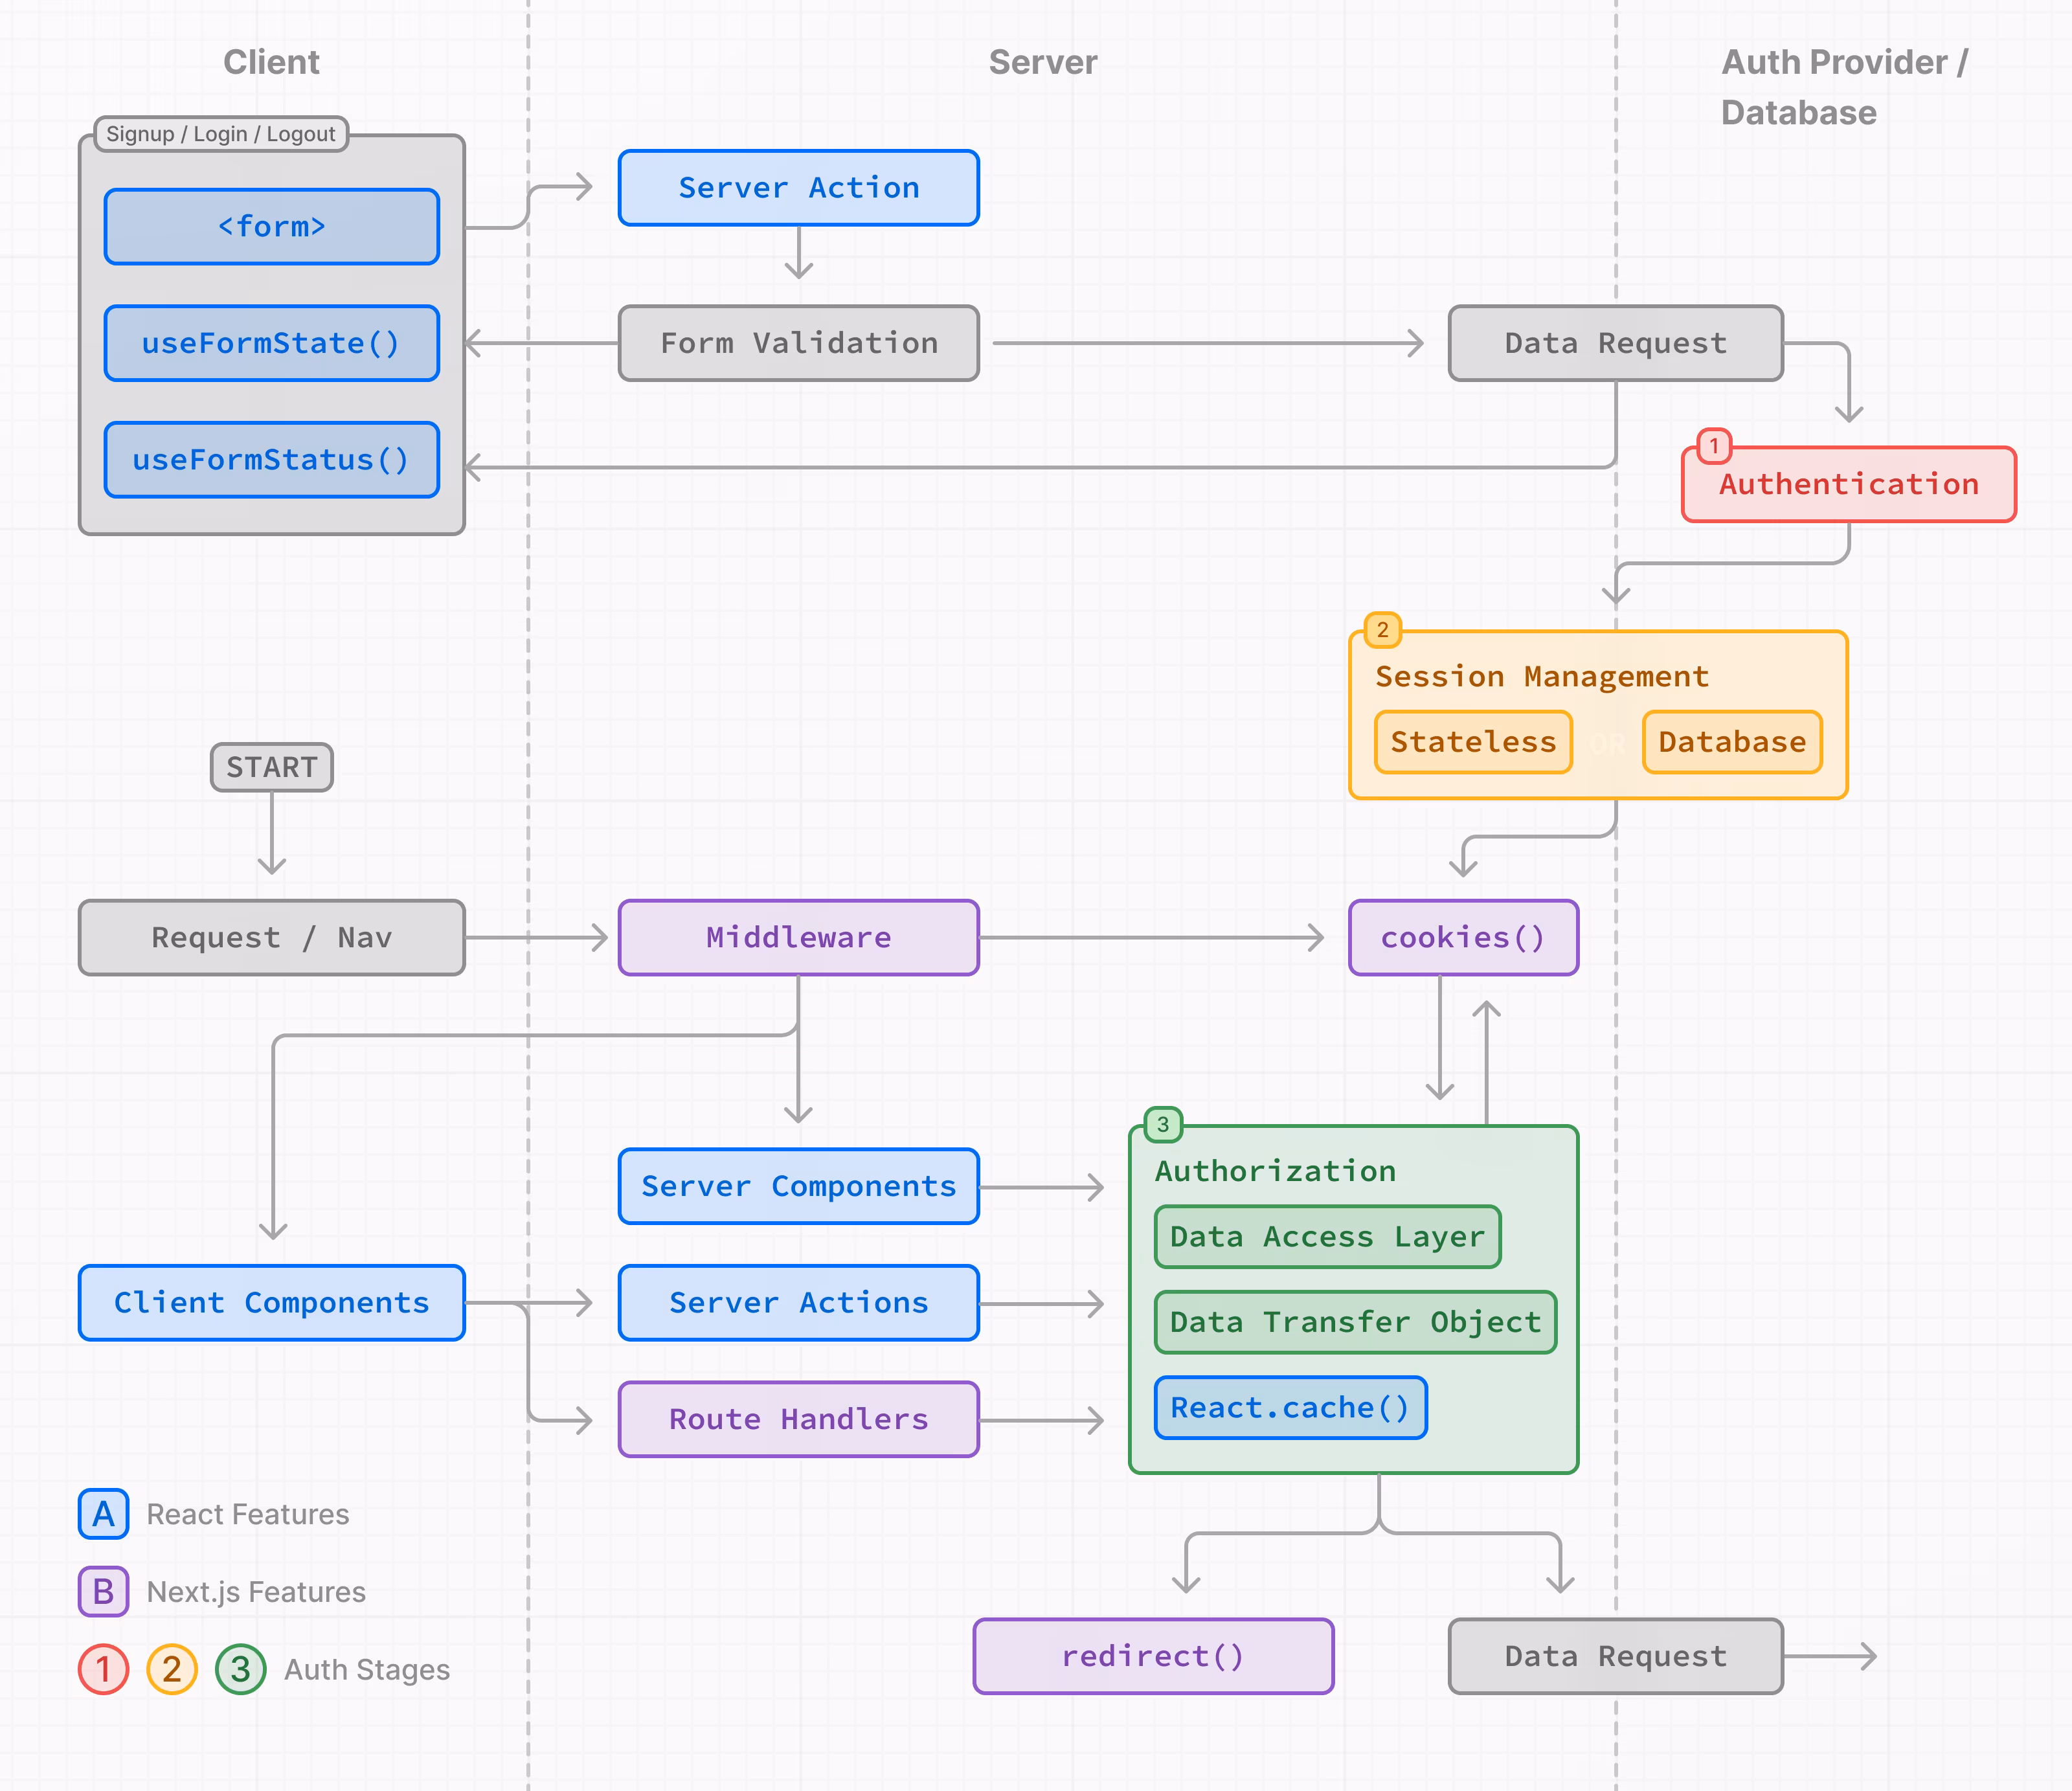
在开始之前,最好将过程分为三个概念:
- 认证: 验证用户是否是他们所声称的人。通常需要用户提供身份验证信息,如用户名和密码。
- Session 管理: 跨请求跟踪用户的授权状态。
- 授权: 决定用户可以访问哪些路由和数据。
下图展示了使用 React 和 Next.js 功能的认证流程:
本页面上的示例演示了用于教学目的的基本用户名和密码认证。虽然您可以实现自定义的认证解决方案,但为了提高安全性和简化流程,我们建议使用认证库。这些库提供内置的认证、会话管理和授权解决方案,以及诸如社交登录、多因素认证和基于角色的访问控制等附加功能。在Auth Libraries部分可以找到相关列表。
认证
注册和登录功能
您可以使用<form>元素与 React 的Server Actions和useActionState()来捕获用户凭据、验证表单字段,并调用您的认证提供商的 API 或数据库。
由于 Server Actions 始终在服务器上执行,它们提供了一个安全的环境来处理认证逻辑。
以下是实现注册/登录功能的步骤:
1. 捕获用户凭据
要捕获用户凭据,请创建一个表单,使其在��提交时调用 Server Action。例如,一个接受用户名、电子邮件和密码的注册表单:
import { signup } from "@/app/actions/auth";

export function SignupForm() {
  return (
    <form action={signup}>
      <div>
        <label htmlFor="name">Name</label>
        <input id="name" name="name" placeholder="Name" />
      </div>
      <div>
        <label htmlFor="email">Email</label>
        <input id="email" name="email" type="email" placeholder="Email" />
      </div>
      <div>
        <label htmlFor="password">Password</label>
        <input id="password" name="password" type="password" />
      </div>
      <button type="submit">Sign Up</button>
    </form>
  );
}
export async function signup(formData: FormData) {}
export async function signup(formData) {}
2. 在服务器上验证表单字段
使用 Server Action 在服务器上验证表单字段。如果您的认证提供商不提供表单验证,您可以使用像Zod或Yup这样的架构验证库。
使用 Zod 作为示例,您可以定义一个具有适当错误消息的表单方案:
import { z } from "zod";

export const SignupFormSchema = z.object({
  name: z
    .string()
    .min(2, { message: "Name must be at least 2 characters long." })
    .trim(),
  email: z.string().email({ message: "Please enter a valid email." }).trim(),
  password: z
    .string()
    .min(8, { message: "Be at least 8 characters long" })
    .regex(/[a-zA-Z]/, { message: "Contain at least one letter." })
    .regex(/[0-9]/, { message: "Contain at least one number." })
    .regex(/[^a-zA-Z0-9]/, {
      message: "Contain at least one special character.",
    })
    .trim(),
});

export type FormState =
  | {
      errors?: {
        name?: string[];
        email?: string[];
        password?: string[];
      };
      message?: string;
    }
  | undefined;
import { z } from "zod";

export const SignupFormSchema = z.object({
  name: z
    .string()
    .min(2, { message: "Name must be at least 2 characters long." })
    .trim(),
  email: z.string().email({ message: "Please enter a valid email." }).trim(),
  password: z
    .string()
    .min(8, { message: "Be at least 8 characters long" })
    .regex(/[a-zA-Z]/, { message: "Contain at least one letter." })
    .regex(/[0-9]/, { message: "Contain at least one number." })
    .regex(/[^a-zA-Z0-9]/, {
      message: "Contain at least one special character.",
    })
    .trim(),
});
为防止不必要地调用您的认证提供商的 API 或数据库,如果表单字段与定义的架构不匹配,您可以在Server Action中提前return。
import { SignupFormSchema, FormState } from "@/app/lib/definitions";

export async function signup(state: FormState, formData: FormData) {
  // Validate form fields
  const validatedFields = SignupFormSchema.safeParse({
    name: formData.get("name"),
    email: formData.get("email"),
    password: formData.get("password"),
  });

  // If any form fields are invalid, return early
  if (!validatedFields.success) {
    return {
      errors: validatedFields.error.flatten().fieldErrors,
    };
  }

  // Call the provider or db to create a user...
}
import { SignupFormSchema } from "@/app/lib/definitions";

export async function signup(state, formData) {
  // Validate form fields
  const validatedFields = SignupFormSchema.safeParse({
    name: formData.get("name"),
    email: formData.get("email"),
    password: formData.get("password"),
  });

  // If any form fields are invalid, return early
  if (!validatedFields.success) {
    return {
      errors: validatedFields.error.flatten().fieldErrors,
    };
  }

  // Call the provider or db to create a user...
}
回到您的<SignupForm />,您可以使用 React 的useActionState() hook 来显示验证错误和表单提交中的挂起状态:
"use client";

import { useActionState } from "react";
import { signup } from "@/app/actions/auth";

export function SignupForm() {
  const [state, action, pending] = useActionState(signup, undefined);

  return (
    <form action={action}>
      <div>
        <label htmlFor="name">Name</label>
        <input id="name" name="name" placeholder="Name" />
      </div>
      {state?.errors?.name && <p>{state.errors.name}</p>}

      <div>
        <label htmlFor="email">Email</label>
        <input id="email" name="email" placeholder="Email" />
      </div>
      {state?.errors?.email && <p>{state.errors.email}</p>}

      <div>
        <label htmlFor="password">Password</label>
        <input id="password" name="password" type="password" />
      </div>
      {state?.errors?.password && (
        <div>
          <p>Password must:</p>
          <ul>
            {state.errors.password.map((error) => (
              <li key={error}>- {error}</li>
            ))}
          </ul>
        </div>
      )}
      <button aria-disabled={pending} type="submit">
        {pending ? "Submitting..." : "Sign up"}
      </button>
    </form>
  );
}
"use client";

import { useActionState } from "react";
import { signup } from "@/app/actions/auth";

export function SignupForm() {
  const [state, action, pending] = useActionState(signup, undefined);

  return (
    <form action={action}>
      <div>
        <label htmlFor="name">Name</label>
        <input id="name" name="name" placeholder="John Doe" />
      </div>
      {state.errors.name && <p>{state.errors.name}</p>}

      <div>
        <label htmlFor="email">Email</label>
        <input id="email" name="email" placeholder="john@example.com" />
      </div>
      {state.errors.email && <p>{state.errors.email}</p>}

      <div>
        <label htmlFor="password">Password</label>
        <input id="password" name="password" type="password" />
      </div>
      {state.errors.password && (
        <div>
          <p>Password must:</p>
          <ul>
            {state.errors.password.map((error) => (
              <li key={error}>- {error}</li>
            ))}
          </ul>
        </div>
      )}
      <button aria-disabled={pending} type="submit">
        {pending ? "Submitting..." : "Sign up"}
      </button>
    </form>
  );
}
您需要知道: 或者,您可以使用
useFormStatushook 来显示挂起状态。
3. 创建用户或检查用户凭据
在验证表单字段后,您可以通过调用您的认证提供商的 API 或数据库来创建一个新用户账户或检查用户是否存在。
从上一个示例继续:
export async function signup(state: FormState, formData: FormData) {
  // 1. Validate form fields
  // ...

  // 2. Prepare data for insertion into database
  const { name, email, password } = validatedFields.data;
  // e.g. Hash the user's password before storing it
  const hashedPassword = await bcrypt.hash(password, 10);

  // 3. Insert the user into the database or call an Auth Library's API
  const data = await db
    .insert(users)
    .values({
      name,
      email,
      password: hashedPassword,
    })
    .returning({ id: users.id });

  const user = data[0];

  if (!user) {
    return {
      message: "An error occurred while creating your account.",
    };
  }

  // TODO:
  // 4. Create user session
  // 5. Redirect user
}
export async function signup(state, formData) {
  // 1. Validate form fields
  // ...

  // 2. Prepare data for insertion into database
  const { name, email, password } = validatedFields.data;
  // e.g. Hash the user's password before storing it
  const hashedPassword = await bcrypt.hash(password, 10);

  // 3. Insert the user into the database or call an Library API
  const data = await db
    .insert(users)
    .values({
      name,
      email,
      password: hashedPassword,
    })
    .returning({ id: users.id });

  const user = data[0];

  if (!user) {
    return {
      message: "An error occurred while creating your account.",
    };
  }

  // TODO:
  // 4. Create user session
  // 5. Redirect user
}
成功创建用户账户或验证用户凭据后,您可以创建一个会话来管理用户的认证状态。根据您的会话管理策略,会话可以存储在 cookie 或数据库中,或者同时存储在两者中。继续阅读会话管理章节了解更多。
提示:
- 上述示例比较冗长,因为它详细解释了认证步骤以用于教学。这强调了实现自己安全的解决方案很快就会变得复杂。考虑使用认证库来简化流程。
- 为了改善用户体验,您可能希望在注册流程中更早地检查重复的电子邮件或用户名。例如,在用户输入用户名或输入框失去焦点时进行检查。这有助于防止不必要的表单提交并为用户提供即时反馈。您可以使用像use-debounce这样的库来管理这些检查的频率。
Session 管理
会话管理确保用户的认证状态在多个请求之间保持。它涉及创建、存储、刷新和删除会话或令牌。
会话有两种类型:
- 无状态会话: 会话数据(或令牌)存储在浏览器的 cookie 中。cookie 随每个请求发送,允许服务器验证会话。这种方法更简单,但如果没有正确实现,可能不太安全。
- 数据库会话: 会话数据存储在数据库中,用户的浏览器只接收加密的会话 ID。这种方法更安全,但实现起来更复杂,并且会消耗更多的服务器资源。
您需要知道: 虽然您可以使用任意一种方法,甚至同时使用两种方法,但我们建议使用像iron-session 或 Jose这样的会话管理库。
Stateless Sessions
要创建和管理无状态会话,您需要遵循以下步骤:
除了以上内容外,建议添加功能来在用户返回应用程序时更新(或刷新)会话,并在用户注销时删除会话。
您需要知道: 检查您的认证库是否包含会话管理功能。
1. 生成密钥
有几种方法可以生成用于签署会话的密钥。例如,您可以在终端中使用openssl命令:
openssl rand -base64 32
此命令会生成一个 32 个字符的随机字符串,您可以将其用作密钥,并将其存储在您的环境变量文件中:
SESSION_SECRET=your_secret_key
然后您可以在会话管理逻辑中引用该密钥:
const secretKey = process.env.SESSION_SECRET;
2. 加密和解密会话
接下来,您可以使用您喜欢的会话管理库来加密和解密会话。继续上面的例子,我们将使用Jose(与Edge 运行时兼容)和 React 的server-only,以确保会话管理逻辑仅在服务器上执行。
import "server-only";
import { SignJWT, jwtVerify } from "jose";
import { SessionPayload } from "@/app/lib/definitions";

const secretKey = process.env.SESSION_SECRET;
const encodedKey = new TextEncoder().encode(secretKey);

export async function encrypt(payload: SessionPayload) {
  return new SignJWT(payload)
    .setProtectedHeader({ alg: "HS256" })
    .setIssuedAt()
    .setExpirationTime("7d")
    .sign(encodedKey);
}

export async function decrypt(session: string | undefined = "") {
  try {
    const { payload } = await jwtVerify(session, encodedKey, {
      algorithms: ["HS256"],
    });
    return payload;
  } catch (error) {
    console.log("Failed to verify session");
  }
}
import "server-only";
import { SignJWT, jwtVerify } from "jose";

const secretKey = process.env.SESSION_SECRET;
const encodedKey = new TextEncoder().encode(secretKey);

export async function encrypt(payload) {
  return new SignJWT(payload)
    .setProtectedHeader({ alg: "HS256" })
    .setIssuedAt()
    .setExpirationTime("7d")
    .sign(encodedKey);
}

export async function decrypt(session) {
  try {
    const { payload } = await jwtVerify(session, encodedKey, {
      algorithms: ["HS256"],
    });
    return payload;
  } catch (error) {
    console.log("Failed to verify session");
  }
}
提示:
有效载荷应仅包含在后续请求中使用的最少、唯一的用户数据,如用户 ID、角色等。不应包含诸如电话号码、电子邮件地址、信用卡信息等个人身份信息,也不应包含密码等敏感数据。
3. 设置 cookies (推荐选择)
要在 cookie 中存储会话,请使用 Next.js 的cookies()API。cookie 应该在服务器上设置,并包含以下推荐选项:
- HttpOnly: 防止客户端 JavaScript 访问 cookie。
- Secure: 使用 https 发送 cookie。
- SameSite: 指定是否允许 cookie 随跨站点请求发送。
- Max-Age or Expires: 在指定时间后删除 cookie。
- Path: 定义 cookie 的 URL 路径。
请参考MDN获取有关这些选项的更多信息。
import "server-only";
import { cookies } from "next/headers";

export async function createSession(userId: string) {
  const expiresAt = new Date(Date.now() + 7 * 24 * 60 * 60 * 1000);
  const session = await encrypt({ userId, expiresAt });

  cookies().set("session", session, {
    httpOnly: true,
    secure: true,
    expires: expiresAt,
    sameSite: "lax",
    path: "/",
  });
}
import "server-only";
import { cookies } from "next/headers";

export async function createSession(userId) {
  const expiresAt = new Date(Date.now() + 7 * 24 * 60 * 60 * 1000);
  const session = await encrypt({ userId, expiresAt });

  cookies().set("session", session, {
    httpOnly: true,
    secure: true,
    expires: expiresAt,
    sameSite: "lax",
    path: "/",
  });
}
在您的服务器操作中,您可以调用createSession()函数,并使用redirect()将用户重定向到合适的页面:
import { createSession } from "@/app/lib/session";

export async function signup(state: FormState, formData: FormData) {
  // Previous steps:
  // 1. Validate form fields
  // 2. Prepare data for insertion into database
  // 3. Insert the user into the database or call an Library API

  // Current steps:
  // 4. Create user session
  await createSession(user.id);
  // 5. Redirect user
  redirect("/profile");
}
import { createSession } from "@/app/lib/session";

export async function signup(state, formData) {
  // Previous steps:
  // 1. Validate form fields
  // 2. Prepare data for insertion into database
  // 3. Insert the user into the database or call an Library API

  // Current steps:
  // 4. Create user session
  await createSession(user.id);
  // 5. Redirect user
  redirect("/profile");
}
提示:
- Cookie 应在服务器上设置 以防止客户端篡改。
- 🎥 观看: 了解有关 Next.js 无状态会话和身份验证的更多信息 → YouTube (11 分钟).
更新 (或刷新) sessions
您还可以扩展会话的过期时间。这对于用户重新访问应用程序后保持登录状态非常有用。例如:
import "server-only";
import { cookies } from "next/headers";
import { decrypt } from "@/app/lib/session";

export async function updateSession() {
  const session = cookies().get("session")?.value;
  const payload = await decrypt(session);

  if (!session || !payload) {
    return null;
  }

  const expires = new Date(Date.now() + 7 * 24 * 60 * 60 * 1000);
  cookies().set("session", session, {
    httpOnly: true,
    secure: true,
    expires: expires,
    sameSite: "lax",
    path: "/",
  });
}
import "server-only";
import { cookies } from "next/headers";
import { decrypt } from "@/app/lib/session";

export async function updateSession() {
  const session = cookies().get("session").value;
  const payload = await decrypt(session);

  if (!session || !payload) {
    return null;
  }

  const expires = new Date(Date.now() + 7 * 24 * 60 * 60 * 1000);
  cookies().set("session", session, {
    httpOnly: true,
    secure: true,
    expires: expires,
    sameSite: "lax",
    path: "/",
  });
}
提示: 检查您的身份验证库是否支持刷新令牌,这可以用于扩展用户会话。
删除 session
要删除会话,可以删除 cookie:
import "server-only";
import { cookies } from "next/headers";

export function deleteSession() {
  cookies().delete("session");
}
import "server-only";
import { cookies } from "next/headers";

export function deleteSession() {
  cookies().delete("session");
}
然后您可以在应用程序中重用deleteSession()函数,例如在用户注销时:
import { cookies } from "next/headers";
import { deleteSession } from "@/app/lib/session";

export async function logout() {
  deleteSession();
  redirect("/login");
}
import { cookies } from "next/headers";
import { deleteSession } from "@/app/lib/session";

export async function logout() {
  deleteSession();
  redirect("/login");
}
Database Sessions
要创建和管理数据库会话,您需要遵循以下步骤:
- 在数据库中创建一个表来存储会话和数据(或检查您的认证库是否处理此功能)。
- 实现插入、更新和删除会话的功能。
- 在存储到用户浏览器之前加密会话 ID,并确保数据库和 cookie 保持同步(此步骤是可选的,但推荐用于 Middleware中的乐观验证)。
For example:
import cookies from "next/headers";
import { db } from "@/app/lib/db";
import { encrypt } from "@/app/lib/session";

export async function createSession(id: number) {
  const expiresAt = new Date(Date.now() + 7 * 24 * 60 * 60 * 1000);

  // 1. Create a session in the database
  const data = await db
    .insert(sessions)
    .values({
      userId: id,
      expiresAt,
    })
    // Return the session ID
    .returning({ id: sessions.id });

  const sessionId = data[0].id;

  // 2. Encrypt the session ID
  const session = await encrypt({ sessionId, expiresAt });

  // 3. Store the session in cookies for optimistic auth checks
  cookies().set("session", session, {
    httpOnly: true,
    secure: true,
    expires: expiresAt,
    sameSite: "lax",
    path: "/",
  });
}
import cookies from "next/headers";
import { db } from "@/app/lib/db";
import { encrypt } from "@/app/lib/session";

export async function createSession(id) {
  const expiresAt = new Date(Date.now() + 7 * 24 * 60 * 60 * 1000);

  // 1. Create a session in the database
  const data = await db
    .insert(sessions)
    .values({
      userId: id,
      expiresAt,
    })
    // Return the session ID
    .returning({ id: sessions.id });

  const sessionId = data[0].id;

  // 2. Encrypt the session ID
  const session = await encrypt({ sessionId, expiresAt });

  // 3. Store the session in cookies for optimistic auth checks
  cookies().set("session", session, {
    httpOnly: true,
    secure: true,
    expires: expiresAt,
    sameSite: "lax",
    path: "/",
  });
}
提示:
- 为了更快地检索数据,您可以考虑使用类似Vercel Redis的数据库。��然而,您也可以将会话数据保留在主数据库中,并结合数据请求来减少查询次数。
- 您可以选择使用数据库会话来处理更高级的用例,例如跟踪用户上次登录时间或活跃设备数量,或让用户有能力注销所有设备。
实现会话管理后,您需要添加授权逻辑来控制用户可以在应用程序中访问的内容和执行的操作。继续阅读授权部分以了解更多信息。
Authorization
一旦用户经过身份验证并创建了会话,您可以实施授权来控制用户在应用程序中可以访问和执行的操作。
主要有两种授权检查类型:
- Optimistic: 使用存储在 cookie 中的会话数据检查用户是否有权访问某个路由或执行某个操作。这些检查适用于快速操作,例如根据权限或角色显示/隐藏 UI 元素或重定向用户。
- Secure: 使用存储在数据库中的会话数据检查用户是否有权访问某个路由或执行某个操作。这些检查更加安全,适用于需要访问敏感数据或操作的场景。
对于这两种情况,我们建议:
- 创建一个 数据访问层 来集中您的授权逻辑。
- 使用数据传输对象 (DTO)以仅返回必要的数据。
- 可选地Middleware来执行乐观检查。
中间件中的乐观检查(可选)
在某些情况下,您可能希望使用Middleware 并根据权限重定向用户:
- 执行 optimistic checks。由于中间件运行在每个路由上, 所以集中重定向逻辑和预过滤未经授权的用户非常适合。
- 保护在用户之间共享数据的静态路由(例如在付费墙后面的内容)
然而,由于中间件运行在每个路由上,包括预加载的路由,因此仅应从 cookie 中读取会话(乐观检查),并避免数据库检查以防止性能问题是非常重要的。
例如:
import { NextRequest, NextResponse } from "next/server";
import { decrypt } from "@/app/lib/session";
import { cookies } from "next/headers";

// 1. Specify protected and public routes
const protectedRoutes = ["/dashboard"];
const publicRoutes = ["/login", "/signup", "/"];

export default async function middleware(req: NextRequest) {
  // 2. Check if the current route is protected or public
  const path = req.nextUrl.pathname;
  const isProtectedRoute = protectedRoutes.includes(path);
  const isPublicRoute = publicRoutes.includes(path);

  // 3. Decrypt the session from the cookie
  const cookie = cookies().get("session")?.value;
  const session = await decrypt(cookie);

  // 5. Redirect to /login if the user is not authenticated
  if (isProtectedRoute && !session?.userId) {
    return NextResponse.redirect(new URL("/login", req.nextUrl));
  }

  // 6. Redirect to /dashboard if the user is authenticated
  if (
    isPublicRoute &&
    session?.userId &&
    !req.nextUrl.pathname.startsWith("/dashboard")
  ) {
    return NextResponse.redirect(new URL("/dashboard", req.nextUrl));
  }

  return NextResponse.next();
}

// Routes Middleware should not run on
export const config = {
  matcher: ["/((?!api|_next/static|_next/image|.*\\.png$).*)"],
};
import { NextResponse } from "next/server";
import { decrypt } from "@/app/lib/session";
import { cookies } from "next/headers";

// 1. Specify protected and public routes
const protectedRoutes = ["/dashboard"];
const publicRoutes = ["/login", "/signup", "/"];

export default async function middleware(req) {
  // 2. Check if the current route is protected or public
  const path = req.nextUrl.pathname;
  const isProtectedRoute = protectedRoutes.includes(path);
  const isPublicRoute = publicRoutes.includes(path);

  // 3. Decrypt the session from the cookie
  const cookie = cookies().get("session")?.value;
  const session = await decrypt(cookie);

  // 5. Redirect to /login if the user is not authenticated
  if (isProtectedRoute && !session?.userId) {
    return NextResponse.redirect(new URL("/login", req.nextUrl));
  }

  // 6. Redirect to /dashboard if the user is authenticated
  if (
    isPublicRoute &&
    session?.userId &&
    !req.nextUrl.pathname.startsWith("/dashboard")
  ) {
    return NextResponse.redirect(new URL("/dashboard", req.nextUrl));
  }

  return NextResponse.next();
}

// Routes Middleware should not run on
export const config = {
  matcher: ["/((?!api|_next/static|_next/image|.*\\.png$).*)"],
};
尽管中间件可以用于初始检查,但它不应是保护数据的唯一防线。大多数安全检查应尽可能接近数据源进行,更多信息请参见数据访问层。
提示:
- 在中间件中,您还可以使用
req.cookies.get('session).value读取 cookie。- 中间件使用Edge Runtime, 以检查您的身份验证库和会话管理库是否兼容。
- 您可以使用中间件的
matcher属性指定中间件应在哪些路由上运行。但是,对于身份验证,建议在所有路由上运行中间件。
Creating a Data Access Layer (DAL)
我们建议创建一个 DAL 来集中您的数据请求和授权逻辑。
DAL 应包括一个函数,用于在用户与应用程序交互时验证其会话。至少,函数应检查会话是否有效,然后重定向或返回进行进一步请求所需的用户信息。
例如,创建一个单独的文件来包含verifySession()函数。然后使用 React 的 cache API 来在 React 渲染过程中缓存函数的返回值:
import "server-only";

import { cookies } from "next/headers";
import { decrypt } from "@/app/lib/session";

export const verifySession = cache(async () => {
  const cookie = cookies().get("session")?.value;
  const session = await decrypt(cookie);

  if (!session?.userId) {
    redirect("/login");
  }

  return { isAuth: true, userId: session.userId };
});
import "server-only";

import { cookies } from "next/headers";
import { decrypt } from "@/app/lib/session";

export const verifySession = cache(async () => {
  const cookie = cookies().get("session").value;
  const session = await decrypt(cookie);

  if (!session.userId) {
    redirect("/login");
  }

  return { isAuth: true, userId: session.userId };
});
然后,您可以在数据请求、服务器操作和路由处理程序中调用verifySession()函数:
export const getUser = cache(async () => {
  const session = await verifySession();
  if (!session) return null;

  try {
    const data = await db.query.users.findMany({
      where: eq(users.id, session.userId),
      // Explicitly return the columns you need rather than the whole user object
      columns: {
        id: true,
        name: true,
        email: true,
      },
    });

    const user = data[0];

    return user;
  } catch (error) {
    console.log("Failed to fetch user");
    return null;
  }
});
提示:
- 数据访问层 (DAL) 可以用来保护在请求时获取的数据。然而,对于用户之间共享数据的静态路由,数据会在构建时获取而不是在请求时获取。使用 Middleware来保护静态路由。
- 对于安全检查,您可以通过与数据库中的会话 ID 进行比较来验证会话是否有效。使用 React 的cache函数避免在渲染期间向数据库发出不必要的重复请求。
- 您可以将相关的数据请求整合到 JavaScript 类中,并在任何方法之前运行
verifySession()函数。
使用数据传输对象(DTO)
在检索数据时,建议您只返回将在应用程序中使用的必要数据,而不是整个对象。例如,如果您正在获取用户数据,您可能只返回用户的 ID 和姓名,而不是包含密码、电话号码等的整个用户对象。
但是,如果您无法控制返回的数据结构,或者您在一个团队中工作并希望避免将整个对象传递给客户端,您可以使用策略来指定哪些字段可以安全地暴露给客户端。
import "server-only";
import { getUser } from "@/app/lib/dal";

function canSeeUsername(viewer: User) {
  return true;
}

function canSeePhoneNumber(viewer: User, team: string) {
  return viewer.isAdmin || team === viewer.team;
}

export async function getProfileDTO(slug: string) {
  const data = await db.query.users.findMany({
    where: eq(users.slug, slug),
    // Return specific columns here
  });
  const user = data[0];

  const currentUser = await getUser(user.id);

  // Or return only what's specific to the query here
  return {
    username: canSeeUsername(currentUser) ? user.username : null,
    phonenumber: canSeePhoneNumber(currentUser, user.team)
      ? user.phonenumber
      : null,
  };
}
import "server-only";
import { getUser } from "@/app/lib/dal";

function canSeeUsername(viewer) {
  return true;
}

function canSeePhoneNumber(viewer, team) {
  return viewer.isAdmin || team === viewer.team;
}

export async function getProfileDTO(slug) {
  const data = await db.query.users.findMany({
    where: eq(users.slug, slug),
    // Return specific columns here
  });
  const user = data[0];

  const currentUser = await getUser(user.id);

  // Or return only what's specific to the query here
  return {
    username: canSeeUsername(currentUser) ? user.username : null,
    phonenumber: canSeePhoneNumber(currentUser, user.team)
      ? user.phonenumber
      : null,
  };
}
通过在 DAL 中集中化您的数据请求和授权逻辑,并使用 DTO,您可以确保所有数据请求都是安全且一致的,从而使您的应用程序在扩展时更易于维护、审核和调试。
您需要知道:
- 有几种不同的方式可以定义 DTO,例如使用
toJSON(),或者像上面的例子那样使用单独的函数,或 JavaScript 类。由于这些是 JavaScript 模式,而不是 React 或 Next.js 的功能,我们建议进行一些研究,以找到适合您应用程序的最佳模式。- 了解更多安全性最佳实践,请参阅我们的Next.js 安全性文章.
Server Components
在服务器组件 中进行身份验证检查对于基于角色的访问非常有用。例如,可以根据用户的角色有条件地渲染组件:
import { verifySession } from "@/app/lib/dal";

export default function Dashboard() {
  const session = await verifySession();
  const userRole = session?.user?.role; // Assuming 'role' is part of the session object

  if (userRole === "admin") {
    return <AdminDashboard />;
  } else if (userRole === "user") {
    return <UserDashboard />;
  } else {
    redirect("/login");
  }
}
import { verifySession } from '@/app/lib/dal'

export default function Dashboard() {
  const session = await verifySession()
  const userRole = session.role // Assuming 'role' is part of the session object

  if (userRole === 'admin') {
    return <AdminDashboard />
  } else if (userRole === 'user') {
    return <UserDashboard />
  } else {
    redirect('/login')
  }
}
在此示例中,我们使用 DAL 中的 verifySession()函数来检查 'admin'、'user' 和未经授权的角色。此模式确保每个用户只与与其角色相对应的组件进行交互。
布局与身份验证检查
由于部分渲染, 在布局中进行检查时要谨慎,因为这些布局在导航时不会重新渲染,这意味着用户会话不会在每次路由更改时进行检查。
相反,您应该在接近数据源或将被有条件渲染的组件处进行检查。
例如,考虑一个共享的布局,它获取用户数据并在导航中显示用户图像。您不应该在布局中进行身份验证检查,而应在布局中获取用户数据 (getUser()),并在您的 DAL 中进行身份验证检查。
这可以保证在应用程序中的任何地方调用 getUser() 时,都会进行身份验证检查,并防止开发人员忘记检查用户是否有权访问数据。
export default async function Layout({
  children,
}: {
  children: React.ReactNode;
}) {
  const user = await getUser();

  return (
    // ...
  )
}
export default async function Layout({ children }) {
  const user = await getUser();

  return (
    // ...
  )
}
export const getUser = cache(async () => {
  const session = await verifySession();
  if (!session) return null;

  // Get user ID from session and fetch data
});
export const getUser = cache(async () => {
  const session = await verifySession();
  if (!session) return null;

  // Get user ID from session and fetch data
});
您需要知道:
- 单页应用程序 (SPA) 的常见模式是,如果用户未授权,则在布局或顶级组件中返回 null。由于 Next.js 应用程序具有多个入口点,此模式 不推荐,因为它无法防止嵌套路由段和服务器操作被访问。
Server Actions
将服务器操作 视为具有与公开的 API 端点相同的安全考虑,并验证用户是否有权限执行变更操作。
在下面的示例中,我们在允许操作继续进行之前检查了用户的角色:
"use server";
import { verifySession } from "@/app/lib/dal";

export async function serverAction(formData: FormData) {
  const session = await verifySession();
  const userRole = session?.user?.role;

  // Return early if user is not authorized to perform the action
  if (userRole !== "admin") {
    return null;
  }

  // Proceed with the action for authorized users
}
"use server";
import { verifySession } from "@/app/lib/dal";

export async function serverAction() {
  const session = await verifySession();
  const userRole = session.user.role;

  // Return early if user is not authorized to perform the action
  if (userRole !== "admin") {
    return null;
  }

  // Proceed with the action for authorized users
}
Route Handlers
将路由处理程序视为具有与公开的 API 端点相同的安全考虑,并验证用户是否有权限访问路由处理程序。
例如
import { verifySession } from "@/app/lib/dal";

export async function GET() {
  // User authentication and role verification
  const session = await verifySession();

  // Check if the user is authenticated
  if (!session) {
    // User is not authenticated
    return new Response(null, { status: 401 });
  }

  // Check if the user has the 'admin' role
  if (session.user.role !== "admin") {
    // User is authenticated but does not have the right permissions
    return new Response(null, { status: 403 });
  }

  // Continue for authorized users
}
上面的示例展示了一个带有两层安全检查的路由处理程序。首先检查是否有活动的会话,然后验证已登录的用户是否为 'admin'。
Context Providers
使用 context providers 进行身份验证工作是由于interleaving的原因。然而,React context在服务器组件中不支持,它们仅适用于客户端组件。
这可以工作,但任何子服务器组件都将首先在服务器上渲染,且无法访问 context provider 的会话数据:
import { ContextProvider } from "auth-lib";

export default function RootLayout({ children }) {
  return (
    <html lang="en">
      <body>
        <ContextProvider>{children}</ContextProvider>
      </body>
    </html>
  );
}
"use client";

import { useSession } from "auth-lib";

export default function Profile() {
  const { userId } = useSession();
  const { data } = useSWR(`/api/user/${userId}`, fetcher)

  return (
    // ...
  );
}
"use client";

import { useSession } from "auth-lib";

export default function Profile() {
  const { userId } = useSession();
  const { data } = useSWR(`/api/user/${userId}`, fetcher)

  return (
    // ...
  );
}
如果客户端组件需要会话数据(例如,用于客户端的数据获取),请使用 React 的 taintUniqueValueAPI,防止敏感的会话数据暴露给客户端。
Resources
现在您已经了解了 Next.js 中的身份验证,以下是一些兼容 Next.js 的库和资源,帮助您实现安全的身份验证和会话管理:
身份验证库
Session 管理库
延伸阅读
继续学习身份验证和安全性,您可以参考以下资源: